Working with electrics, a few basic guidelines
WIRES
Thickness: Try to fill a bucket with water from a garden hose. It takes forever… Then try to fill the bucket with a firehose. Done in four seconds! Both hoses have the same pressure, but the thin diametre of the garden hose restricts waterflow. The same principles applies to electric wires. Voltage can be compared to the speed of the water. Current can be compared to the amount of water delivered. A thin wire connected to a heavy consumer (lights, starter motor, etc) will restrict the flow of electric current.
 It will also behave as a resistor. Which is another word for heater element. The thinner the wire is, and the larger the current flow is, the warmer the wire will be. This is one of the reasons cars sometimes catches fire.
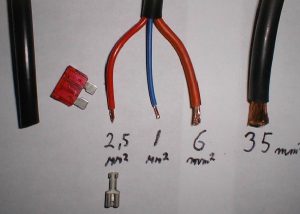
Every now and again, it’s necassary to replace a damaged wire, or add new ones. It’s always wrong to use a thinner wire than the original. It’s never wrong to use a thicker one. For the headlights, minimum acceptable wires are 2,5 square millimetres (2,5 mm²). I always use 6 mm². If I’m installing a new wiring harness, I always put the wires in a tube. See above picture.

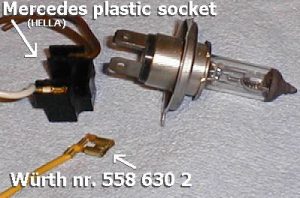
H4 SOCKETS
Upgrading the wiring harness on a car with H4 bulbs has always been a problem. A normal 6,3mm wireshoe will not fit on the back of a H4 bulb. I’ve searched for loose wireshoes for over ten years, without any luck. The H4 socket uses special 8mm wire-shoes with lock tabs, and there’s two versions of them.
-The “straight ahead” socket.
-The “90 degree” socket.
So far, the only H4 socket available for larger than 1,5 mm² wires, has been a
HELLA socket with
press-in-clamps (8JA 001 909-001). It corrodes, and the wires fall out when changing a bulb.
It will take 6 mm² wires, though. Then one day I found a supplier for the wire shoe of the angular type: Würth nr. 558 630 2. Saab uses the “straight ahead” socket, but you’ll find plenty of angled ones in a scrapyard.
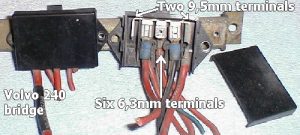 THE WIRE BRIDGE
When you have installed a new fusebox (Hella 8JD 005 993-001) for a new headlight wiring harness, all five fusebox inputs must be connected to the battery. Connecting five thick wires to the battery makes quite a mess.
This is where the wire bridge comes in. I stumbled upon it by pure accident, poking around in a scrapyard. At the front inner wing of most Volvo 240’s, on a bracket next to the lights-relay is a plastic box with two 9,5mm and six 6,3 mm terminals. All bridged together! Install this wire bridge next to the fusebox, and connect wires from the two 9,5mm terminals to the battery. Nice and tidy.
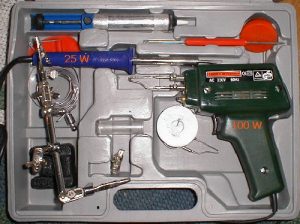
SOLDERING ON…
You may have noticed that there aren’t many electrical connections in a car that are soldered.
There’s two reasons for it:
– A soldering isn’t very mechanically stable. Vibrations in a car will make it crack and disintegrate.
– A soldering is not a very good conductor of electric current. (!) When soldering low-current electronic components on a printboard, it acts as a “metallized glue”. In a car’s high-current connection, we clamp the terminals on the wires. Soldering can be used to seal the connection, in order to prevent corrosion.
RELAYS
A thin wire will restrict the flow of electric current. A long wire will do the same thing. The key word here is SHORT, THICK wires.
A relay is a “remote controlled switch” which is placed between the power source and the consumer so the wires can be as short as possible. The long wires from the switch is now only used to operate the relay, and can be as thin as you please. Current-draw in the relay-coil is only 150mA.
3M SCOTCHLOCK
Occationally when rummaging around in car’s electrics I find Scotchlocks, fitted by someone who’s been in there before me. Here’s what I do to them:


You dont have to do as I do of course, but I’ve found these little buggers to be a sorce of bad contact. A much more reliable and simple way to join two wires is to de-isolate one centimetre and twist one of them around the other. Finish off with a piece of electric tape.
BATTERIES and AMPÈRE ratings. There seems to be a little confusion over this matter. One guy wanted to move the battery from the engine bay, to the boot. (A wise thing to do, on a Saab turbo.) He wanted to install a fuse on the long cable, and since he had a 60 A battery, he wondered if an 80 A fuse would be sufficient? I told him that this fuse would blow the instant he twisted the ignition key. Why?
– First of all: A typical starter motor for a 2 litre four cylinder engine, developes one and a half horespower. Which is 1100 Watt. And the nature of an electric motor is such, that it draws most current while stationary. When we apply a heavy load on the battery, the voltage drops. Starter motors are rated at 9 V. Let’s use the formula: I = P / U. 1100 / 9 = 122A. But that is at full starter motor rpm, if the rpm drops (like for instance when you engage it), the current draw multiplies.
– Secondly: The battery is not 60 A. It’s 60 Ah. Which means 60 Ampère-hours.
It works like this: You can put a one Ampère load at the battery for sixty hours.
Or: A sixty Ampère load at the battery for one hour.
Or: A 120 Ampère load at the battery for half an hour.
Or: A 240 Ampère load at the battery for a quarter of an hour.
And so on, until you reach the rated maximum start current of your battery.
For a 60 Ah typical standard battery, this would be around 200-350 A.
For a 68 Ah SØNNAK POWER battery, this would be around 650 A.
For a 56 Ah OPTIMA battery, this is 850 A.
(The 80 A fuse would vaporize!)
![]()